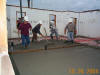
October 25, 2004 - Monday - The start of a very busy week. Today we pour
the slab for the garage and the front porch. Both of these can be done
"out of the chute" which means we don't need a concrete pumper truck and can
reach everywhere we need to put concrete just with the chute on the back of the
concrete truck. The concrete trucks carry chute extension pieces and with
all of them installed they can typically reach about 18 feet from the back of
the truck. This shot shows our concrete finisher extraordinaire, Scott
Bradley and his helper Eddie, placing concrete in the garage with the chute
extended all the way. We have placed a chalk line on the walls to indicate
to Scott where we want the "finished floor" height (we also spray paint clear
lacquer over the chalk like so it stays put).
Garages typically have a "rake" or "fall" to them which means the floor is
sloped toward the garage door. The helps any water or snow a car might
bring in drain out toward the garage door (also useful for hosing out the
garage). Very little fall is actually needed to make water drain away
properly so we typically put a fall of 1/8 to 1/4 inch per foot in our
garages. We can apply this to our garage as follows: If we want 1/8
inch per foot of fall and our garage is nearly 20 feet deep that means the end
by the garage door is 2 and 1/2 inches lower than the end by the door going into
the home (20 x 1/8 = 2.5). If we want a fall of 1/4 inch per foot than
this difference would increase to 5 inches (20 x 1/4 = 5). This garage has
a fall of about 1/6 inch per foot in actuality. We figured this out so the
garage floor would meet the driveway and still allow the driveway to also have a
fall of at least 1/8 inch per foot out to the street. We want rain and
snow melt to drain off toward the street, not toward the home!
This picture also shows a board coming out from the "service" or "man" door
(a door which humans use) and the board looks like it is sitting on stakes.
That is indeed the case. In large areas like this a concrete finisher will
typically put stakes or "pins" in the middle of the area. These stakes
have adjustable hooks on them to hold the board. The concrete finisher
adjusts these hooks with a laser level (prior to the pour) such that when the
board is placed on the hooks, one edge of it (usually the bottom of the board)
represents the finished floor height, just like the chalk lines around the
walls. You can imagine that in a large area, once the concrete finisher
got away from the walls it would be very hard to judge where the finished floor
height should be. These stakes and board in essence bring the chalk line
out into the middle of the room so the concrete finisher can make sure the floor
is level, or in this case is where it should be, since the garage has a rake to
it.
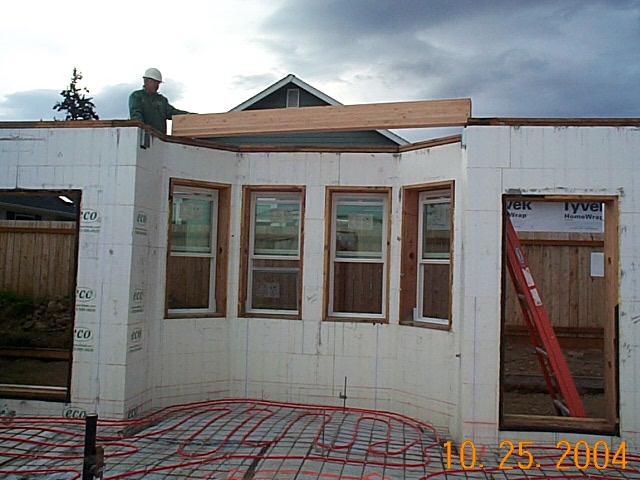
 October 25, 2004 - Monday - While Scott is working on making the garage and
front porch nice and smooth, staff member Mark Everson and President Jeffrey
Bruton work on installing the "glu-lam" beam over the dining area. A
glu-lam beam is a wood beam made up of regular sized boards glued together.
This is done so you can make the beam out of regular lumber instead of finding a
giant tree to make the beam out of one piece of wood. We order glu-lams
from our local lumber yard. This one is over 11 feet long and is very
heavy! This shot shows Mark after we have managed to get it up on our top
plates.
October 25, 2004 - Monday - While Scott is working on making the garage and
front porch nice and smooth, staff member Mark Everson and President Jeffrey
Bruton work on installing the "glu-lam" beam over the dining area. A
glu-lam beam is a wood beam made up of regular sized boards glued together.
This is done so you can make the beam out of regular lumber instead of finding a
giant tree to make the beam out of one piece of wood. We order glu-lams
from our local lumber yard. This one is over 11 feet long and is very
heavy! This shot shows Mark after we have managed to get it up on our top
plates.
 October 25, 2004 - Monday - This is another of Jeffrey's famous "arm shots".
After he takes the previous picture, he returns to his ladder and takes this
picture close to the action to show his confidence level in the upcoming beam
placement.
October 25, 2004 - Monday - This is another of Jeffrey's famous "arm shots".
After he takes the previous picture, he returns to his ladder and takes this
picture close to the action to show his confidence level in the upcoming beam
placement.
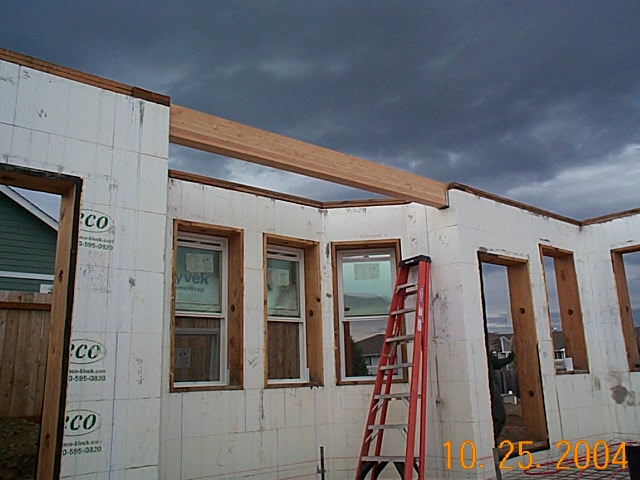
 October 25, 2004 - Monday - Of course the beam placement goes perfectly
and here is the result. The hangers in which the beam rests of course from
Simpson's Strong-Tie
product line. The exact Simpson product we used are the
MBHA masonry hangers. These are bolted directly to the concrete walls
of the home.
October 25, 2004 - Monday - Of course the beam placement goes perfectly
and here is the result. The hangers in which the beam rests of course from
Simpson's Strong-Tie
product line. The exact Simpson product we used are the
MBHA masonry hangers. These are bolted directly to the concrete walls
of the home.
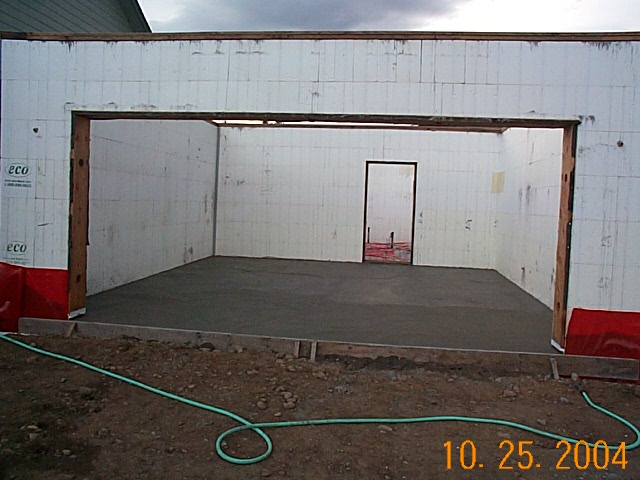
 October 25, 2004 - Monday - Here is the finished result of Scott's good
work on the garage floor. Nice and smooth.
October 25, 2004 - Monday - Here is the finished result of Scott's good
work on the garage floor. Nice and smooth.
 October 25, 2004 - Monday - Here is another shot of Scott's good work on
the front porch. Concrete "flat work" (so named because it is indeed flat)
in an outdoor setting like this is typically "broom" work or given a "broom
finish". Nothing cryptic here. After Scott gets the slab nice a
smooth, he uses a big broom with soft bristles to put a bit of texture in the
finish so its not slick (like a smooth finish would be) if (or more like when)
it gets wet. The four post supports on the edge of the porch are
again Simpson units. This time Simpson part number
EPB66 were used. These will be the bottom supports for the columns on
the front porch.
October 25, 2004 - Monday - Here is another shot of Scott's good work on
the front porch. Concrete "flat work" (so named because it is indeed flat)
in an outdoor setting like this is typically "broom" work or given a "broom
finish". Nothing cryptic here. After Scott gets the slab nice a
smooth, he uses a big broom with soft bristles to put a bit of texture in the
finish so its not slick (like a smooth finish would be) if (or more like when)
it gets wet. The four post supports on the edge of the porch are
again Simpson units. This time Simpson part number
EPB66 were used. These will be the bottom supports for the columns on
the front porch.
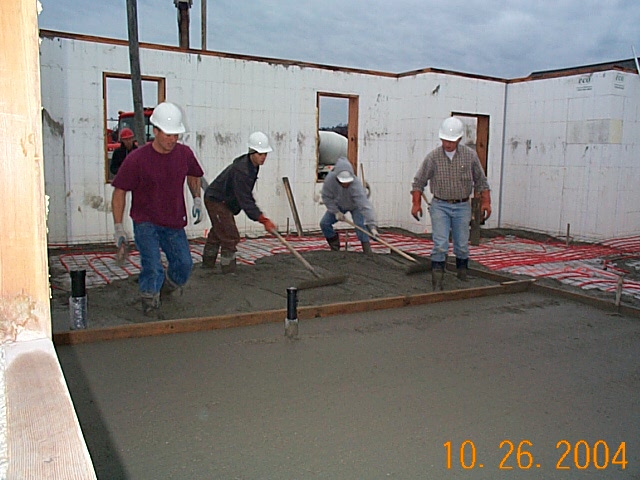
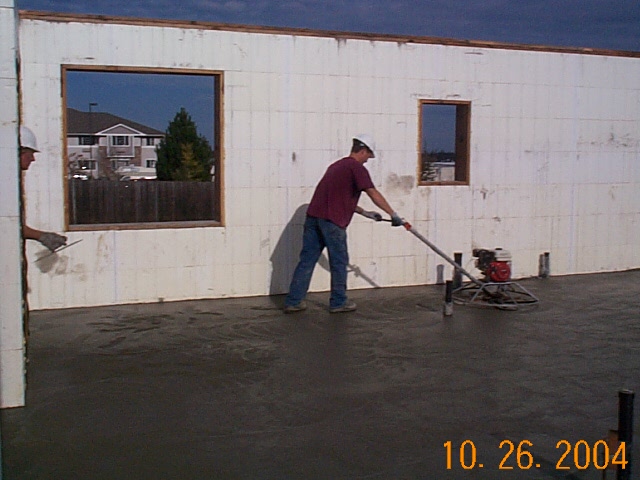
 October 26, 2004 - Tuesday - The very next day bring the pour of the
interior slab for the home. Here Scott and crew start to place and finish
the first section of the interior slab. From right to left is master of
ceremonies, Scott Bradley, Joey, Eddie, and Tommy. If you look close you
can see Chris, our pumper truck operator, over Tommy's shoulder, outside the
window.
October 26, 2004 - Tuesday - The very next day bring the pour of the
interior slab for the home. Here Scott and crew start to place and finish
the first section of the interior slab. From right to left is master of
ceremonies, Scott Bradley, Joey, Eddie, and Tommy. If you look close you
can see Chris, our pumper truck operator, over Tommy's shoulder, outside the
window.
 October 26, 2004 - Tuesday - This shots shows Scott and the guys working
there way toward the garage service door, which will be their exit. Left
to right this time is Joey on the pumper hose placing concrete, Scott, Eddie,
and Tommy work the "mud" (a slang term for concrete), while Chris keeps and eye
on his pumper boom high over the home.
October 26, 2004 - Tuesday - This shots shows Scott and the guys working
there way toward the garage service door, which will be their exit. Left
to right this time is Joey on the pumper hose placing concrete, Scott, Eddie,
and Tommy work the "mud" (a slang term for concrete), while Chris keeps and eye
on his pumper boom high over the home.
 October 26, 2004 - Tuesday - This picture shows Tommy using the power
trowel after the concrete is hard enough to stand on.
October 26, 2004 - Tuesday - This picture shows Tommy using the power
trowel after the concrete is hard enough to stand on.
 October 26, 2004 - Tuesday - Here Scott puts the finishing touches on the
interior slab with hand trowels after a long day. Nice work Sir!
October 26, 2004 - Tuesday - Here Scott puts the finishing touches on the
interior slab with hand trowels after a long day. Nice work Sir!
 October 28, 2004 - Thursday - Trusses arrive! The first trusses
delivered are for the garage and master bedroom (south) end of the home.
This includes three gable ends: one large gable on the south side of the home
and two smaller gables for the front of the garage and the rear of the master
bath (the west side above the glass block window and the soaking tub).
Also included are two girders trusses that will hold all the trusses between the
garage and the master bath. Typically the cost of the truss package
includes placing them up on the sill plates with a crane truck. Such is
the case here. We got this truss package from Precision Truss located
between Sequim and Port Angeles, WA. They are the only truss plant on the
North Peninsula. Mike, our crane truck operator, is one of the best in the
business. Good thing too since some of our trusses are over 45 feet long
and weight nearly 500 pounds!
October 28, 2004 - Thursday - Trusses arrive! The first trusses
delivered are for the garage and master bedroom (south) end of the home.
This includes three gable ends: one large gable on the south side of the home
and two smaller gables for the front of the garage and the rear of the master
bath (the west side above the glass block window and the soaking tub).
Also included are two girders trusses that will hold all the trusses between the
garage and the master bath. Typically the cost of the truss package
includes placing them up on the sill plates with a crane truck. Such is
the case here. We got this truss package from Precision Truss located
between Sequim and Port Angeles, WA. They are the only truss plant on the
North Peninsula. Mike, our crane truck operator, is one of the best in the
business. Good thing too since some of our trusses are over 45 feet long
and weight nearly 500 pounds!
 October 28, 2004 - Thursday - This shot shows the big gable on the south
side and both girder trusses on the east and west. Notice that the girder
trusses are not alone. If you look close you can see that they have
the other small gables trusses with them and that the black shipping bands (to
keep the various packages together) are still in place. Staff member Mark
Everson can be seen installing hangers on the east girder truss and home
building hired gun extraordinaire, Richard Craig, is working on the west girder
truss.
October 28, 2004 - Thursday - This shot shows the big gable on the south
side and both girder trusses on the east and west. Notice that the girder
trusses are not alone. If you look close you can see that they have
the other small gables trusses with them and that the black shipping bands (to
keep the various packages together) are still in place. Staff member Mark
Everson can be seen installing hangers on the east girder truss and home
building hired gun extraordinaire, Richard Craig, is working on the west girder
truss.
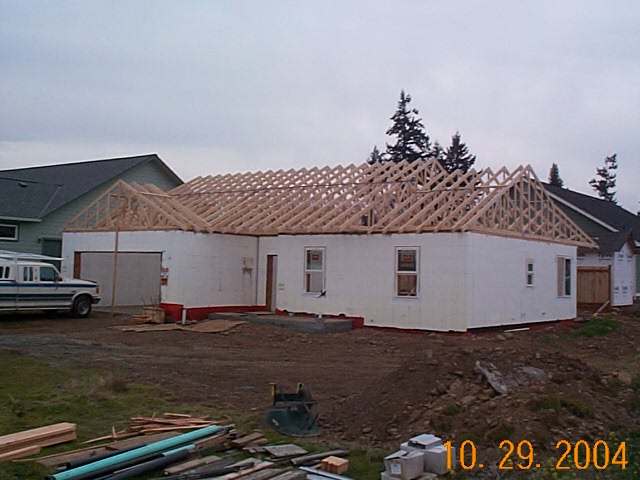
 October 29, 2004 - Friday - All the rest of our trusses come today and
here is a shot of the home after all are set in place. Its very important
at this point to brace all the trusses so they don't come down if a wind storm
hits. When the sheathing (plywood or OSB) is installed, it not only
provides the basis for our roof but also becomes a needed structural component
since it ties together all the trusses, vastly increasing their strength.
October 29, 2004 - Friday - All the rest of our trusses come today and
here is a shot of the home after all are set in place. Its very important
at this point to brace all the trusses so they don't come down if a wind storm
hits. When the sheathing (plywood or OSB) is installed, it not only
provides the basis for our roof but also becomes a needed structural component
since it ties together all the trusses, vastly increasing their strength.
 October 29, 2004 - Friday - Here is a good picture of the North side of
the home. The big gable is shown and you can see how the back patio will
be covered.
October 29, 2004 - Friday - Here is a good picture of the North side of
the home. The big gable is shown and you can see how the back patio will
be covered.
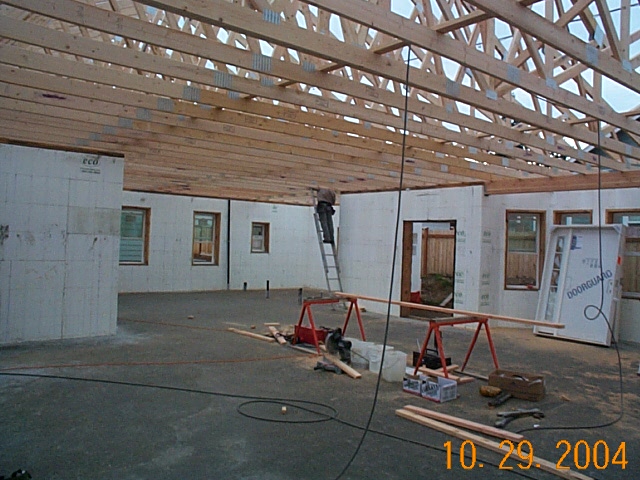
 October 29, 2004 - Friday - After working for weeks with dirt under foot
and the wide open sky above, this is indeed a week of much change! This
shot shows the interior of the home after the trusses are installed.
Notice that there are no load bearing walls inside the home (walls that support
the weight of the trusses/roof). This shot also gives a feel for the
ceiling height which will be 9 feet 5 inches.
October 29, 2004 - Friday - After working for weeks with dirt under foot
and the wide open sky above, this is indeed a week of much change! This
shot shows the interior of the home after the trusses are installed.
Notice that there are no load bearing walls inside the home (walls that support
the weight of the trusses/roof). This shot also gives a feel for the
ceiling height which will be 9 feet 5 inches.
Back to Summer Breeze Lot 27
Gallery

![[Company Logo Image]](../../images/gmb_hires_10_percent.gif)