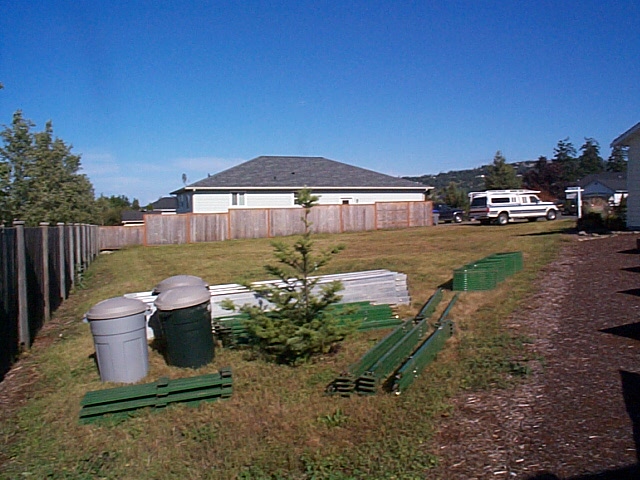
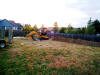
 June 18, 2010 - Friday - The site of the new home, Summer Breeze Lot 26.
This shot is looking toward the East from the west most point of the lot.
Lot 26 is all in nicely cut grass, while the edge of Lot 27 can be seen on the
right with it's bark ground cover. The only indication that ground
breaking is days away are the various components of alignment system for our
insulated concrete forms neatly stacked in the foreground! Here they will
be completely out of our way until needed.
June 18, 2010 - Friday - The site of the new home, Summer Breeze Lot 26.
This shot is looking toward the East from the west most point of the lot.
Lot 26 is all in nicely cut grass, while the edge of Lot 27 can be seen on the
right with it's bark ground cover. The only indication that ground
breaking is days away are the various components of alignment system for our
insulated concrete forms neatly stacked in the foreground! Here they will
be completely out of our way until needed.
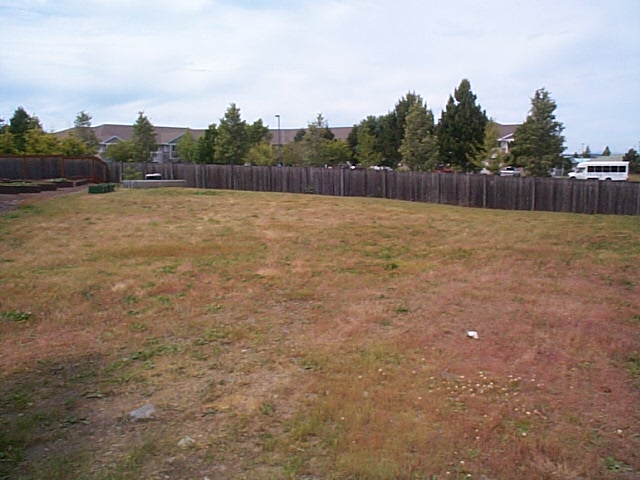
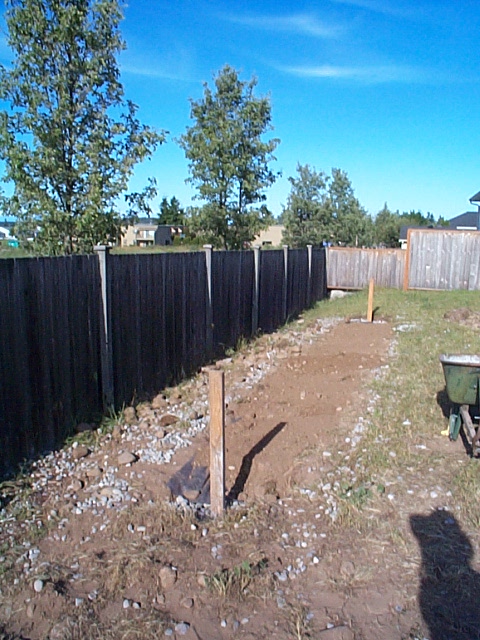
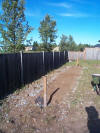
 June 23, 2010 - Wednesday - Lot 26 just moments before ground breaking!
Looks flat doesn't it?
June 23, 2010 - Wednesday - Lot 26 just moments before ground breaking!
Looks flat doesn't it?
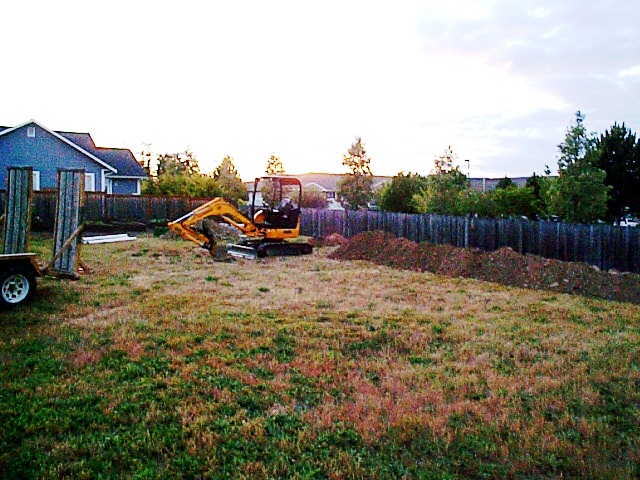
 June 23, 2010 - Wednesday - The end of "ground breaking day". Shown here
is the little excavator rented from our good friends at D & K Rentals
(360-683-4808). Today we dug down to expose our sewer connection, and also
dug our "dry well" which is where our downspouts will drain. This
excavation was the very first in our construction process because once we start
building the home, we won't be able to get an excavator to these back areas of
the lot. Always try to plan ahead!
June 23, 2010 - Wednesday - The end of "ground breaking day". Shown here
is the little excavator rented from our good friends at D & K Rentals
(360-683-4808). Today we dug down to expose our sewer connection, and also
dug our "dry well" which is where our downspouts will drain. This
excavation was the very first in our construction process because once we start
building the home, we won't be able to get an excavator to these back areas of
the lot. Always try to plan ahead!
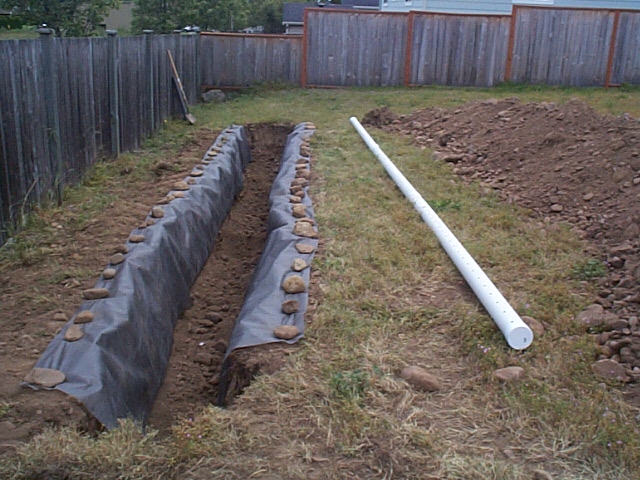
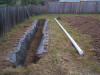 June 24, 2010 - Thursday - Here is our dry well ready for drain rock and pipe
installation. Remember our dry well is where our down spouts drain into
and its purpose is to put run off water (in this case from our roof) into the
ground in a controlled and desired manner. Its not allowed to simply drain
our down spouts out to the city street where the water would go into the storm
drain system. Nor is it allowable to have your down spouts drain in such a
manner as to have the water go onto neighboring properties. Further we
don't want large pools of water on the property when it rains hard...so putting
it in the ground in a controlled manner is the way to go! It also helps to
recharge underground aquifers. In this picture you can see the "filter
fabric" or landscape fabric lining the sides of our drywell and folding over its
upper edges. Rocks (that we have PLENTY of) are used to keep it in place
until we backfill (cover it with dirt). The 4" perforated drain pipe that
will go into our drywell is seen on the right. The filter fabric is needed
to keep fine dirt out of the holes in the drain pipe because if these holes
filled with dirt the water would have a hard time getting out of the pipe and
back into the ground!
June 24, 2010 - Thursday - Here is our dry well ready for drain rock and pipe
installation. Remember our dry well is where our down spouts drain into
and its purpose is to put run off water (in this case from our roof) into the
ground in a controlled and desired manner. Its not allowed to simply drain
our down spouts out to the city street where the water would go into the storm
drain system. Nor is it allowable to have your down spouts drain in such a
manner as to have the water go onto neighboring properties. Further we
don't want large pools of water on the property when it rains hard...so putting
it in the ground in a controlled manner is the way to go! It also helps to
recharge underground aquifers. In this picture you can see the "filter
fabric" or landscape fabric lining the sides of our drywell and folding over its
upper edges. Rocks (that we have PLENTY of) are used to keep it in place
until we backfill (cover it with dirt). The 4" perforated drain pipe that
will go into our drywell is seen on the right. The filter fabric is needed
to keep fine dirt out of the holes in the drain pipe because if these holes
filled with dirt the water would have a hard time getting out of the pipe and
back into the ground!
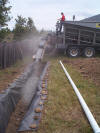 June 24, 2010 - Thursday - Next we have the "AgraCat" from Sequim Redi-Mix
(360-683-5680) come out to make filling our dry well with drain rock MUCH
easier! The AgraCat is a truck that can "shoot" lots of different types of
aggregate quite a great distance with amazing accuracy! The accuracy is
usually dependant on the operator and Jessie does a great job! We use
"7/8" Minus" gravel to fill the the dry well. This is drain rock where no
rock is bigger than 7/8" of an inch. The dry well is filled with gravel to
again make sure the holes in the drain pipe don't get filled with dirt.
June 24, 2010 - Thursday - Next we have the "AgraCat" from Sequim Redi-Mix
(360-683-5680) come out to make filling our dry well with drain rock MUCH
easier! The AgraCat is a truck that can "shoot" lots of different types of
aggregate quite a great distance with amazing accuracy! The accuracy is
usually dependant on the operator and Jessie does a great job! We use
"7/8" Minus" gravel to fill the the dry well. This is drain rock where no
rock is bigger than 7/8" of an inch. The dry well is filled with gravel to
again make sure the holes in the drain pipe don't get filled with dirt.
 June 24, 2010 - Thursday - When we have filled our dry well half full of gravel
we stop the AgraCat and put our perforated drain pipe in place. The holes
on the drain pipe can clearly be seen in this picture. Also note the caps
on the ends of the pipe. They are there only to keep dirt and gravel
out until we hook our down spout piping to both ends of the pipe.
June 24, 2010 - Thursday - When we have filled our dry well half full of gravel
we stop the AgraCat and put our perforated drain pipe in place. The holes
on the drain pipe can clearly be seen in this picture. Also note the caps
on the ends of the pipe. They are there only to keep dirt and gravel
out until we hook our down spout piping to both ends of the pipe.
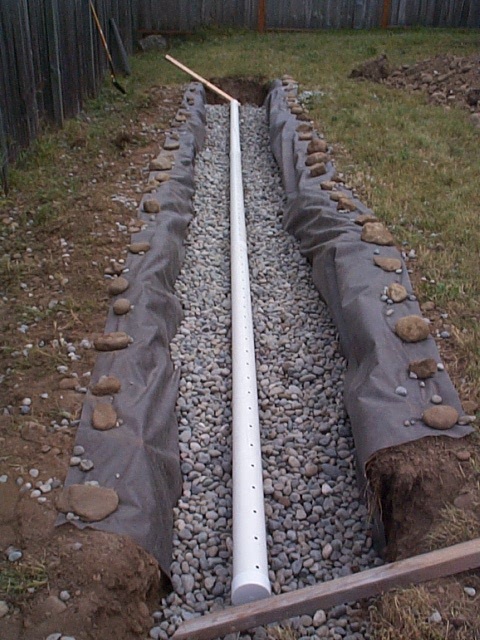
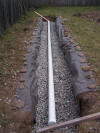
 June 24, 2010 - Thursday - Once our perforated drain pipe is in place we
continue filling the dry well with gravel. This picture shows the dry well
completely full of gravel...and the end of our drain pipe can be seen in the
foreground. The 2x4 baord sticking straight up at the far end marks the
other end of the pipe since its covered with gravel! We need to remember
to fold the flaps of filter fabric back onto the gravel on each side of the dry
well before covering it with dirt. This will help keep dirt out of our dry
well and hence out of our perforated drain pipe.
June 24, 2010 - Thursday - Once our perforated drain pipe is in place we
continue filling the dry well with gravel. This picture shows the dry well
completely full of gravel...and the end of our drain pipe can be seen in the
foreground. The 2x4 baord sticking straight up at the far end marks the
other end of the pipe since its covered with gravel! We need to remember
to fold the flaps of filter fabric back onto the gravel on each side of the dry
well before covering it with dirt. This will help keep dirt out of our dry
well and hence out of our perforated drain pipe.
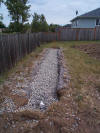
 June 24, 2010 - Thursday - All done! We were lucky enough to get our dry
well inspected today so...the dry well is now back filled
(covered with dirt) and another 2x4 board marks the near end of the pipe.
These boards will make it easy to find the ends of the pipe in the future.
June 24, 2010 - Thursday - All done! We were lucky enough to get our dry
well inspected today so...the dry well is now back filled
(covered with dirt) and another 2x4 board marks the near end of the pipe.
These boards will make it easy to find the ends of the pipe in the future.
 June 25, 2010 - Friday - When we had the little excavator on the site earlier
in the week, we also used it to dig a hole to expose the connection to the city
sewer pipe. On most developed lots the sewer connection location is marked
with a green colored pipe or board sticking out of the ground. Green is
the color for marking sewer and storm drains that our located underground and
you can see the whole underground
color code
here. Ours was marked with a piece of white plastic pipe sticking out
of the ground...and its top was painted green. If you look carefully you
can see this white pipe sticking out of the ground in the first picture in this
Gallery. Its right next to the little fir tree's trunk, about half way up
the tree on the right hand side. Its behind the alignment system and the
little tree so its a bit hard to see. Usually the pipe that marks the
sewer connection is long enough so that it rests on the city sewer pipe down in
the ground. This is a great thing because when you are digging a hole to
find your sewer connection with an excavator, you surely don't want to hit the
city sewer pipe and damage it! That could be an expense mistake!
When you're digging with the machine, once the pipe becomes loose, its very
smart to then start digging by hand with a shovel to finally find the sewer
pipe. When digging by hand you can be much more careful and if you hit the
pipe, you will do it gently with the shovel and not with the bucket on the
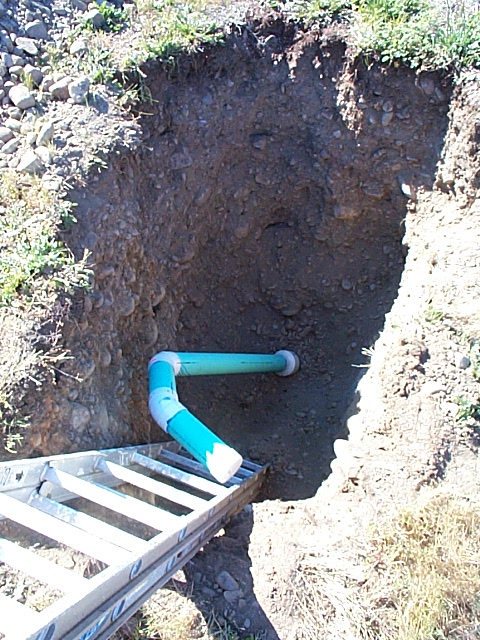
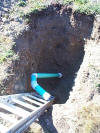
excavator! This picture shows our newly installed sewer pipe connected to
the city sewer pipe down in the ground, and then coming up and turning East
towards where the new home will be. We have brought the sewer pipe up so
that it is roughly 24 inches below "grade" (grade is just a term for ground
level at any given point). We'll back fill this hole once our sewer
connection is inspected, but we won't cover the end of our pipe. That way
we won't need to dig it back up again when we are ready to connect the home to
the sewer! The only issue is we will have to be a bit careful since we'll
have a 2 foot hole in the ground at this location! Once again the whole
point of connecting to the city sewer now is so we can use a machine to dig the
deep hole for us since we would not be able to get the excavator back to this
location on the lot once construction on the home begins. We passed our
"sewer connection to main" today so we are good to backfill!
June 25, 2010 - Friday - When we had the little excavator on the site earlier
in the week, we also used it to dig a hole to expose the connection to the city
sewer pipe. On most developed lots the sewer connection location is marked
with a green colored pipe or board sticking out of the ground. Green is
the color for marking sewer and storm drains that our located underground and
you can see the whole underground
color code
here. Ours was marked with a piece of white plastic pipe sticking out
of the ground...and its top was painted green. If you look carefully you
can see this white pipe sticking out of the ground in the first picture in this
Gallery. Its right next to the little fir tree's trunk, about half way up
the tree on the right hand side. Its behind the alignment system and the
little tree so its a bit hard to see. Usually the pipe that marks the
sewer connection is long enough so that it rests on the city sewer pipe down in
the ground. This is a great thing because when you are digging a hole to
find your sewer connection with an excavator, you surely don't want to hit the
city sewer pipe and damage it! That could be an expense mistake!
When you're digging with the machine, once the pipe becomes loose, its very
smart to then start digging by hand with a shovel to finally find the sewer
pipe. When digging by hand you can be much more careful and if you hit the
pipe, you will do it gently with the shovel and not with the bucket on the
excavator! This picture shows our newly installed sewer pipe connected to
the city sewer pipe down in the ground, and then coming up and turning East
towards where the new home will be. We have brought the sewer pipe up so
that it is roughly 24 inches below "grade" (grade is just a term for ground
level at any given point). We'll back fill this hole once our sewer
connection is inspected, but we won't cover the end of our pipe. That way
we won't need to dig it back up again when we are ready to connect the home to
the sewer! The only issue is we will have to be a bit careful since we'll
have a 2 foot hole in the ground at this location! Once again the whole
point of connecting to the city sewer now is so we can use a machine to dig the
deep hole for us since we would not be able to get the excavator back to this
location on the lot once construction on the home begins. We passed our
"sewer connection to main" today so we are good to backfill!
Back to Summer Breeze Lot 26
Gallery
![[Company Logo Image]](../../images/gmb_hires_10_percent.gif)